Art is the Name of the Game: See what we've done!

How can ARTWORK change the design of your room??

Art can not only help set the stage for an amazing space, but can also transform it instantly into something you never knew it could be.
 We love to play with color, texture and pattern when it comes to artwork.

Here are 4 reasons why ART is most important:
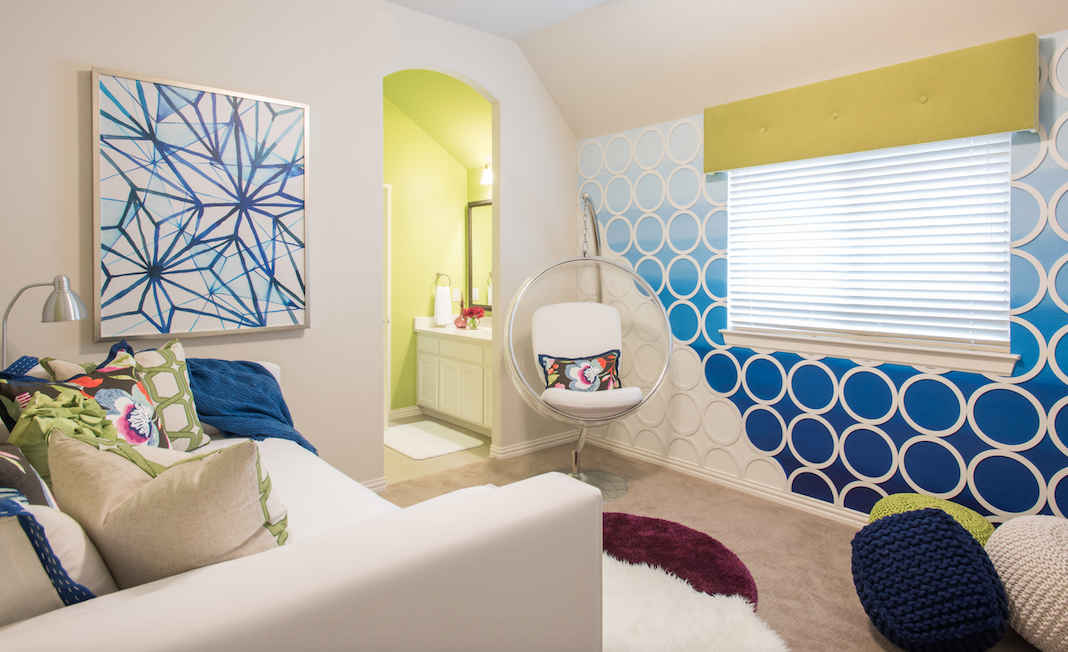
1. Add movement:
The patterns throughout an art piece can move through the room and draw the eye to important focal points.
TCI Project Link 

TCI Project Link 

2. Create color for the color scheme:
Sometimes in an art piece you are able to bring in all the colors in the space in one place. This helps to CREATE a color scheme and be able to use it throughout your design.
TCI Project Link 

TCI Project Link 

3. Balance the scale of the room:
Whether it is an oversized art piece or a collection of several small pieces, art can balance a large wall or a wall that might be too small in order to help the room feel complete.
TCI Project Link 

4. Be a focal point:
Like we have done in this beautiful bathroom, a large piece of art can easily steal the show and be a wonderful conversation piece or the first place you eye looks.
TCI Project Link 

So the moral of the story -- don't forget your art!!!

Should you add a little GLOSS?

Does a little shine scare you?? Well we are here to tell you why "gloss" can actually be a GOOD thing... if you use it right.

This is the inspiration picture of a home office we are designing for a 
University Park new build... HIGH LACQUER=LUXE!


It will be stunning when completed with this edgy sheen...

Try it yourself! Here are 5 reasons why GLOSS, shine or lacquer will pack 
a punch and turn your room to glam!

1. Gloss gives an accent area (wall or ceiling) extra punch.
The ceiling is a fun and different place to add gloss in an unexpected way 
that is not too "in your face."


2. Sometimes a glossy neutral takes the place of needing to add a color.
We love the glossy cabinets used in this design, and while there is no "color," the addition of gloss to the neutral gray cabinets gives them just the right amount of unusual that a color isn't needed!


3. Glossy finishes are easy to clean.
Whether it is a paint finish or a glossy tile, this finish is the best and easiest thing to clean!!


4. It can add glamour to ordinary pieces.
Furniture or art pieces can become dull but with the addition of a little gloss, this cabinet turned into a shine of a piece.


The gloss finish applied to this gorgeous art piece gave it a completely different look that turned this entryway into glam!


5. It enhances architectural built-ins.
We love the use of matte and gloss finishes together in this design. It accents important areas of features within a build project.


Yes or No? Will you add a little GLOSS to your life?

How to Prioritize Home Projects

Home projects can be daunting ... and can seem endless! 

Now that I have one of mine under my belt by completing my bathroom renovation...
but what is next?!

How do you get a handle on your never ending list and make it actually happen??

PRIORITIZE!!
TCI Project link

Here are our tips to help you take the first step!!

1. Take Inventory: 
Look around and see what needs to be completed and prioritize the situation.

TCI Project link

2. Take a look at yourself:
Some might forget about this step. Figure out how "motivated" you currently are in order to decide what project you tackle first!

TCI Project link

3. Money Money:
Many projects will cost you money. Take a look at this too in order to know which might be more feasible at the current time.

TCI Project link

4. Figure out how to execute things:
Do you want to start small and work up, go room by room or tackle the project as a whole?

TCI Project link

Color-Blocking Confidence

COLOR BLOCKING:
The art of mixing two different colors in solid fashions to create a completely new design.

This was a fad that started in the fashion industry and took off strong!!

It took a little while, but it has now begun to creep into the interior industry and we are loving the freedom to create with this new thought process.

But how do you use "color blocking" correctly? 
Well we are here to tell you 5 quick ways to ensure the best:

1. Start Small:
Start with items that can be moved around, such as chairs, tables and accessories.


2. Mix bright colors with a dark neutral color:
This pops the accent with a grounding color


3. Create a geometric pattern with several colors as a motif or accent strip:
Can't commit to one color? Try them all in an interesting pattern


4. Use different hues of the same color:
Choose this simpler solution that still is perceived as color blocking when you are afraid to mix too many colors.


5. Pair a bright accent wall with a light neutral wall:
This will allow your accents to shine


Are you ready to COLOR BLOCK?

Back To School Organization

It's that TIME OF YEAR again!! Who is ready? 
BACK TO SCHOOL!!
How are you going to handle the influx of papers, activities and supplies??

The first thing that will help with keeping the kids (and yourself) organized during the school year is a central area where all our tips below can take place. 

This mud room/office area at a beautiful Flowermound home we recently completed shows many ways you can put our tips to use! Read on to find out how!


Not only can this be an organized space ... it can be beautiful too! With custom wallpaper and built in units, talk about IDEAL organization!


4 Tips on How TO organize your BACK TO SCHOOL Life:

 1. Have a place to store their "papers" and goodies they will continuously come through the door with stacks of. Whether its a counter with trays or specific drawers for each kid, see what works for your family.


2. Desk Area. Have a place where they can do homework and keep their supplies "hidden" in drawers or baskets.


3. Home Base. Have a place near the back door for reminders, such as a chalkboard!


4. Hooks, Hooks and more Hooks. You need to have a place to hang their jackets, backpacks and lunch boxes ... otherwise you WILL have it all in a pile on the floor.


And our favorite Back to School accessory --- These weekly "stickies"! With space to write reminders, homework and activities and then conveniently stick it on a mirror or in the car for all to see!


Good Luck and Happy Back-to-School to ALL!


The Newest Fad -- A Peacock Chair

Have you heard of the ....

PEACOCK CHAIR? 


These woven, colored or neutral airy chairs are all the rage 
right now!!

I mean ... note the resemblance!! What great inspiration!


But the question arises .... where and HOW do you put these interesting pieces of furniture to use? In an aesthetically pleasing and "allowed" way?

HERE'S HOW:

1. Use a peacock chair to bring texture to a seemingly "plain" room.

2. Use a peacock chair to pull your eye to a specific area of a home... a "focal" point
 link

3. Use a peacock chair to lighten, brighten and enhance an airy room.
 link

4. Use a PAINTED peacock chair to take the spotlight of a "normal" setting.
 link

5. Use a peacock chair to DOUBLE the fun!

How would YOU use a peacock chair??


A Client Project: Minimalistic Master Bath

This galley shaped master bathroom took on an entirely different personality 
when we got a hold of it!

I've worked with this young couple for years and now they have a sweet little daughter! With that said, they have streamlined the house which is super functional and 
THE MOST ORGANIZED HOME I've ever been in!
(I wanted to gut my closet every time I left there)

The client's top priorities were :
1. Functionality
2. Less is More
3. Clean and Simple

With an overall neutral color palette including subtle shades of purple
we are ecstatic with the turn out!


But FIRST -- Where it all began:

 AFTER and BEFORE:

Vanities

Shower and Tub

Where did WE start and how did we get there?
Check out our drawings of the space!


Elevation drawings of the vanity and shower/tub wall help to visualize what the end product will look like, and ensure correct measurements of all items.


Now for the final product!!

We wrapped the drop in rectangular tub in the same linear stria floor tile that covered the main flooring and continued it around the entrance to the frameless shower for a cohesive, collective look.


The modern brushed nickel plumbing fixtures for the bathtub sit atop the tile decking around this beautifully contemporary drop in bathtub.


A linear 4"x 16" glass tile in soft gray was chosen for the frameless shower and we decided to run it vertically around the space for an even more modern look.


Cabinetry style can ultimately set the stage for the style of a space. This completely flat panel custom cabinetry immediately gives this bathroom a look of "sleek". With the clean gray quartz countertops and coordinating brushed nickel straight pulls, the less-is-more concept quickly comes to fruition.


Floating vanity mirrors behind the 2 pendants dropped in front of each vanity gives each partner his and her own space to love in the bathroom. Along with plenty of cabinet space and the custom center cabinetry and towel holding cabinet, we were able to give this vanity a very unique and one-of-a-kind look.


See your simple because simply-perfect with the help of TCI ;)


Powered by Blogger.