Client Project: Lucas Custom Build in Progress


Always a pleasure to spend time dreaming and designing with our sweet client, Ronda.

As you know, we've been working on this custom build in Lucas for quite a while now 
which proves that extraordinary projects take detailed planning.

Playing paper dolls:) with mosaic tile strips, a dirty visit to the job site to confirm trim work and 
wall texture as well a trip back to Antique Floors in Dallas where we found this gorgeous
Vanilla Onyx and laser cut decorative tile for the master bath combination.

Good things come to those who wait... and plan! It's a joy and privilege  to work
with Ronda on her beautiful, transitional home.

Client Project: Contemporary Fireplaces

I can't wait to show you this finished project! 
Do you remember my client, 
New York, New York?

We recently completed the photography session the full house renovation and we
will gradually share with you all the different rooms of the house! 

Starting off, we reveal the living room of this stunning home, 
and it's unique, custom fireplace surround.


A full room view helps to give you a feel for the masculine, clean and transitional style.


This beveled, stairstepping fireplace creates a stunning focal point for the room. 
We flanked the custom wood fireplace with lounge chairs and bunching cubes 
to frame out the style perfectly.


Want to see where this space started??
The Before 


Do you like the look of a contemporary fireplace, but don't know where to start in the design? 
Check out a few pointers below!:

1. Decide on a color scheme.
Do you want to create warm wood tones, or cool, grey stone colors?


2. Create straight, clean lines in your formation.
When deciding on your mantel and style of your fireplace, be sure to stick with lines that form the style "contemporary". Clean lines, straight lines.

3. Choose your material.
What would you like your fireplace to be constructed from? Stone, brick, plaster, wood?
Sometimes it is nice to go with a mixture as we did with the fireplace at the beginning
of this post. We mixed wood with tile.


4. Floor mounted or floating firebox?
For an even more contemporary look, many like to create a "floating" fireplace by mounting their firebox a foot or so above the floor without creating a seat or step below. Another great option is to bring your fireplace and firebox all the way to floor as we did!


Stay tuned for more...

The ARC Lamp

Join the contemporary CRAZE! 


We are using one of these fun, over-arching floor lamps in a client's gameroom right now 
and wanted to share how great these lights really are!

1. Chrome Arc Floor Lamp - We love how this breaks up the arc but still extends to spread the light

   2. Chrome and Black Marble Arc Floor Lamp - This lamp combines materials to create depth 
in the lamp

3. Stainless Arc Floor Lamp - Add a touch of sparkle! Instead of the typical linen shade, this takes you for a loop with the stainless steel shade.

4. Large Arc Floor Lamp - We like how this lamp arches so high and can easily arc over a 
sectional or sofa

5. Industrial Arc Floor Lamp - Pulleys and Wood...use this lamp for a technical and industrial look!

Will you jump on the bandwagon??

Finding the Perfect Dinnerware Set.


Plate Sets and serving ware....all adds to the design of your kitchen! 
I recently purchased a new set of dinnerware that fits perfectly in my new kitchen and cabinets ;)


The funny thing about these plates is the fact that 
I spotted them in the kitchen at the Coastal Living 
Showhouse I attended in Rosemary Beach. 
I flipped one over to find the brand only to be 
surprised that these classic beauties were from Target

Yay me... I won't sweat it if one of my blondes 
accidentally throws breaks one.

So to add to the crisp white, here are some of geometric and contemporary patterns 
on dinnerware that are filling the stores this holiday season. 

Our favorites!!


Such an interesting shape and design to this piece:

The simplicity of the square shape is beautiful and classic!
 Martha Stewart knew what she was doing!

Want to go a bit more industrial? Try this Juliska plate to add to your collection!

Add some color to your kitchen!

Or complete your look with this Vera Wang collection of beauty.

It's hard to go wrong with all these great options! Happy Serving!

Client Project: Master Bedroom Retreat


We recently completed a Master Bedroom for a wonderful, long time client. 

You may remember their Contemporary Home Office from a few months ago? 

We were thrilled to continue the cohesive color palette throughout the home. 
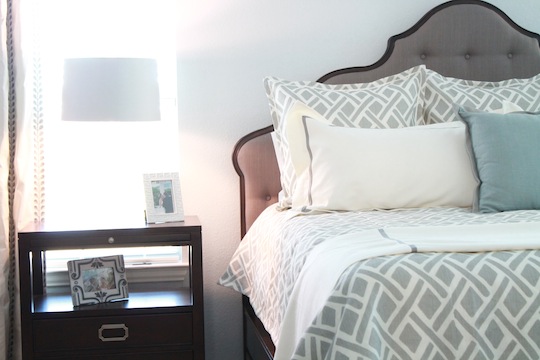
This blue, grey and cream scheme creates a very calming, yet sophisticated look for a master bedroom.

(P.S. At TCI, we use all color palettes... not just blues:)... however, you
may beg to differ! It's such a soft, peaceful color which easily
lends itself to many transitional looks)


Take a look at our handiwork:

A small seating group finishes out this cozy corner. Using Arteriors lamps, Vanguard Lounge Chairs, and a Taylor King Ottoman, this corner is very inviting to curl up and read a good book!


The bedroom furniture included a custom upholstered headboard, nightstands, bed bench,
a mirrored armoire, and dresser from Drexel Heritage.


The unique, geometric duvet and coverlet, made by Legacy Home,
form the perfect concept for this space.


The antique mirrored armoire helped to bounce the light around the room.


What do you think?? We are incredibly pleased with this installation!


TCI Featured on House of Turquoise

Traci Connell Interiors is  featured today on House of Turquoise

Her unique design style, love of all hues of blue, and fun personality all have come together 
to form an incredible blog that we love!

Be sure to stop by our friend today to check out our guest post!


Coaster Necessity for the Company!

As company begins to trickle in for Thanksgiving, don't forget to protect 
your pretty furniture with a pretty coaster!

Here are a few of OUR favorite coasters for the holiday!

Have a great Tuesday!

Friday Favorites at TCI

We made it to Friday! Happy Weekend ;)
We are continuing with our Friday series..hope you enjoy!

Top 5 Favorite Things of the Week!
1. Wood Log Wall

2. Layering Accessories and Creating Collages

3. Unique Accessories

4. Arteriors Wood Carved Pendant

5. Thanksgiving Preparations!

Have a great weekend!

Collage Wall Styling Tips

A collage, a grouping, a collection.
This is an excellent way to showcase a variation of art pieces or photos that mean 
something special to you. But how can get this look, and make sure it is right?? 

We spent some time today creating a layout for a client with new frames and her family photos!

We have some tips for you to get this "grouping" look...in a "designer" look!

1. Frames
This is the first thing you will notice about the collection. We would say, make sure all the frames match...perfectly. But there could be exceptions if you have a collection of frames that have coordinating finishes. Otherwise...stick to the same frame across the board ;)

2. Layout
You don't want to space the images out too far apart, otherwise the grouping will look like it doesn't belong together. Be sure the frames aren't more than 3-4" apart all the way around. Closer together is even better!

3. Images
This is definitely the key to the perfect collage wall. First decide if you plan to use family photos or a specific variation of art. If you choose family photos, try to coordinate the scenes or colors within the images, example..print them all in black and white. If you choose to use art, find a collection of images that correspond and enjoy ;) See image below for a great example.

4. Mat
In order to create a look that is thought out and well put together...you should mat each of your images. Choose a neutral mat color and then decide on a thickness. Really any thickness will work, depending on your style.

5.  Layout and Practice. 
Choose your layout style. You can be symmetrical by using the same frame sizes, or create a dimensional layout by mixing frame sizes. 
Be sure and stay within a "box" when arranging your frames so you don't have a floating frame outside the arrangement that doesn't make sense.
Draw out your arrangement and lay all your frames on the floor in an open area before hanging them so you can see what they will look like on the wall.

Happy Frame Hanging!!

Powered by Blogger.