DIY: Posh Nailhead Pumpkins


As a follow up to this week's ezine,
Interior Trends: Budget Friendly Fall Decorating Ideas
and a preview of Friday's blog post... Gearing up for Halloween, I
 bring you a tutorial of such a cool autumn idea from Karen at
 Strictly Simple Style and www.myhomeideas.com.


First gather your white pumpkins and upholstery tacks (try your local fabric store).
Depending on your color scheme, you could also dab them with paint... say, light turquoise?


Print out a large version of your intial and trace the outline onto the pumpkin...
creating a faint line

Remove the paper, push your nailhead in along the line... and viola- you are done!

These must go on my front porch!


The designs are endless... house numbers, fleur de lis, crosses, polka dots!


There's not one thing about this picture that doesn't make my heart skip a beat...
uh, the clock? WOW!


Cottage Living, you do not disappoint-
Easy and Inexpensive... it doesn't get much better than that!!!

If you do this, email me a picture!


Until next time,
Traci


Bring Habersham Home!


I know this is a small pic, but it is massive in style! 

My daughter who live in Austin is looking for bedroom furniture
(which is totally hilarious since she has not one design bone in her body). 

I offered to send her some photos of options, but she was up for the
challenge and went shopping a few weekends ago. 

The first dresser she emailed had some sort of tree bark feature on the the front
of the drawers... uh no.  She got better as the day went on, but of course
did not pull the trigger and seal the deal!

(It's better that she sticks to her day job:)


So... last week I thought I'd offer her our master bedroom furniture
(which is 12 years old)
and she kindly turned me down and said it was too big for her room. 
I think she was being kind... but isn't FREE the best kind?

I want the look above... or the look below brought to you by

American Treasures... wow! 

During the Dallas Spring Market, I met the local Habersham rep, Mark,
and he has been sending me eye candy ever since!

This would make a perfect bachelor's chest for me you!


Habersham is a leader in high end furniture who is known for
expert designand quality craftmanship.


The artisans hand finish every piece and sign and date it... truly making it custom for you!


The wood/mirror combo is soooo up my alley!!!


Heart flutters-


They describe the American Treasures Collection as:

Timeless style. Clean, classic lines

Who does that sound like?  I LOVE IT!

While Habersham is new on the block for this more modern look, take a minute to view what they are known for... it is simply stunning!

Custom Cabinetry

It takes my breath away...


Check out the finish!

The scrollwork on the glass fronts... ahhhhh


Entryways as well-

 and bathrooms, too!!!!


Another surprise is that they customize dressing areas as well...
check out the website to see them.

If you are ready to bring a little Habersham to your home, call me!

Until next time,
Traci

Images via* Google images, Habersham


DIY: Wrap those Books!


Classic... with a twist-  bring the idea to your bookshelves!  Most of my
clients are trying to simplify and create a cohesive look (especially in their family rooms). 
We all have so many personal items we want to display and most of you have figured
out to use books to diversify height and help create unity.

At times, the combination of decorative books creates even more of a hodge podge look,
thus defeating the purpose. 

Here is a solution for you!


Wrap those books!

My client above took on this task and wrapped each book... at night watching tv,
in the carpool line, whenever she found a free moment... and achieved great success. 

She found a textured vellum, which is frequently found on the scrapbook paper isle.

A great new tip is to use paintable wallpaper-


Great idea from the free magazine Lowes Creative Ideas

Here's How:

1. To determine the height of the jacket, measure the length of your book’s
spine and add 2 inches.

2. To find the width of the jacket, open your book, lay it flat, and measure its span.
Add the width of the covers (not including the spine) to this number.

 
3. Cut a piece of paintable wallpaper (#314377) to these dimensions. Lay the paper facedown
on a work surface. Fold 1 inch in at each long edge of the paper.


4. Place the book in the center of the paper. It will overlap the folded long edges and hold
 themin place. Wrap the paper around the book, folding over the book covers.
Insert the covers into the pockets created by the folds, as shown above.

Thank you Lowe's for the tutorial!


Be creative in your wrapping. 

Tie in into your design style... either paint the wallpaper above the color of your choice
or hit the stores to find perhaps:

1.Brown craft paper for a rustic look
2.Burnt orange paper in your UT themed offices (go Longhorns!)
3. Colored scrapbook paper for your kids' rooms


This is a great DIY project, but if you need help... call me!
 
 
Until next time,
Traci
 

The Perfect Panels


Gentle persuasion pays off!

Back in July, I wrote about a new project for my DINK's, which you can read about here,
and we are at the half way point to completion! 

When we finished the living room  tv room a year and a half ago, I just knew
we needed window treatments to highlight the bay window. 
Mrs. DINK loves her simplicity and decided against them.

Along comes a great fabric and in turn.... great draperies! 
 We installed on Friday, check them out!

Before


After


I will get a full view next time I am there, but how great are these!

Now we are waiting for the kitchen table and chairs to arrive- do you know how
difficult it is to find a classy wood table top with a protective finish????? 
We did!

Can't wait to see the white dining table and chairs with red leather pleather seats!
Oh, la la!


I brought a few options for artwork in the kitchen on Friday as well. 
Mrs. DINK and I love this choice...


Hope Mr. DINK does as well.

Here's a few pics of how panels can finish off your room-

Nice choice using grommets


A splash of apple green!


How fun!


I like the way they are installed right on the molding-


If you are thinking of adding window treatments before the holidays, call me asap! 


Until next time,
Traci


DIY: Create your Own Art Gallery

If you missed my Ezine that went out yesterday... here's the scoop!  The info is too
good to fly under the radar...(So you don't miss out next time, sign up here
for frequent design inspiration and decorating tips).


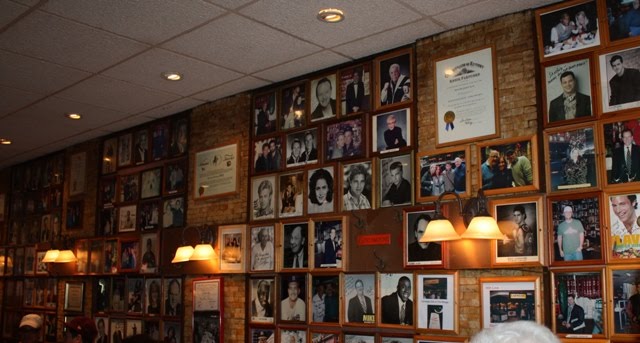
We've all seen the restaurants that have their walls covered with celebrities who have dined there... the Carnegie Deli in NYC was no exception. Photos everywhere!


During my last two design consultations, we have addressed a similar issue:
Where can I display our family photos?

My answer is to create a Wall Photo Gallery...
of course, with a twist!

Here's how:


Find a Space- I am not a huge fan of lining the frames up the stair case wall,
but rather grouping photos together in similar frames to create a focal point.
The idea is to create an "art gallery" look by leaving a very small space between each piece.


Think out of the Box- There are so many configurations to arrange
 your photographs. If you have a narrow wall, use the vertical space and
hang two linear rows of four leaving just a few feet off the ground.

I also love to incorporate ledges in my galleries to prop
some frames as well as overlap to create dimension.

Here is a great resource for you!


and more...


Avoid mistakes!- We all do it, but try this next time to avoid hole patching!
Play with your arrangement on the wall by formatting the look with craft paper
and painters tape. Keep moving it until you get the look you want.


If you need a hand, I have two resources for you:
Me... for creative ideas to display your precious memories
and my art installer... who can hang them correctly the first time!


My Favorite "Foto" Look!


Number One Perk: The photos are mounted on foam board and can be easily switched out.

Number Two Perk: The art piece can be customized to your design style and room.


What a statement!

Until next time,
Traci

Images via* Moi, (missing resources for the other great photos and awesome photo poster... if you have them, send to me!)


I found 5 pounds in NYC...


How can I give you a report about my NYC trip without talking about food? 

First of all, this was ridiculous-

A must have for me was The Reuben... but geez!  I didn't make a dent in it!

My $25 sandwich from Carnegie Deli went to waste, as I had to high tail it to the airport-


Another staple of mine is the almighty Bagel

Thick and doughy from Ess-a Bagel... yummy-
I brought a dozen home on the plane:)


Saw this when walking to dinner!


Yes, Rachel, it would have been fun if I had an extra day...

But ended up here instead-


I had a great dish... Penne alla Vodka (fitting for me)- however, you would
never know I was 50% Italian by the way this Georgia Girl was
pronouncing most of the dishes... sorry Dad!

After dinner around 9 pm (my bedtime), the girls wanted to head here-


Times Square... so I perked up and made my way.

More food...


(Austin's favorite)

which reminded me of Interior Design (always)...

Have you ever seen a chair made of candy?


Thanks to fellow blogger Traci Zeller for these delicious photos!

So, what's a business trip without a little indulgence?


Now back to real chairs:)


Until next time,
Traci

Images via*  Moi, Traci Zeller, Ess-a- Bagel


Powered by Blogger.