CI Design Delivered Project: Transitional Living Room Space Planning!

Our FIRST CI Design Delivered project!


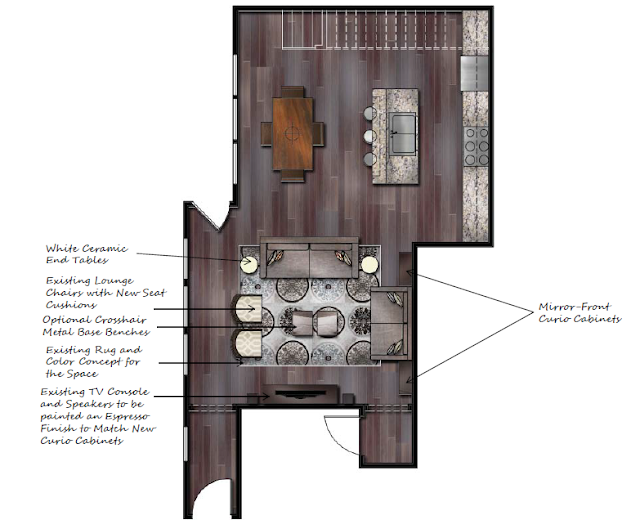
We recently completed our very first "Designed Delivered" Living room 
and Kitchen Remodel. Take a look below for a sneak peek of the
 design and to find out 
what the buzz is all about!

Don't forget to visit Connell Interiors to learn more about it!!

This particular client had an excellent taste 
for transitional design. She loved greek key
chevron and trellis patterns...
which were able to incorporate all of them!


You will receive a rendered floorplan from the 
dimensions and measurements that you supply us with:

 
And rendered elevations for your aid in 
installing and creating!:

Visit our CI Design Delivered page to learn how you too can get the
Connell Interior Style in your own home!


Yes, YOU too can be a "do-it-yourself'er"! 
We thought of several great tips for living room design 
and space planning during this Design Delivered project 
that YOU could implement TODAY!:
 

Here are some major points thanks to Houzz and Nest to consider 
when planning the layout of your room:

1. Create seating arrangements that can actually be used.
Can you chat with a friend without yelling? Allow them to be flexible.

via
2. Allow ample space for moving through a room.
Do you have to squeeze by the coffee table? 18" is the standard distance to allow 
from a table to a sofa or chair. If your space is tight, you can cheat a 
little and go with 15" -- but not less. 


Candice Olson Design

3. Place the largest pieces first :
 In furniture arrangement of any room, the major piece for the 
primary activity of the room must be considered first – 
the sofa in the living room


4. Be aware of traffic patterns
You can direct the flow of traffic through furniture arrangement. 
Leave a minimum of two and a half feet for walkways and avoid 
flowing traffic through a conversational grouping if possible. 
5. Let your personality shine through
Ultimately, your home is an expression of who you are. Design your rooms 
so that you are comfortable, with a realistic eye on your own taste and habits 
rather than relying on a picture from a magazine. After all,
you’re going to be living there.


 Let us know if WE can help you with your living room space plan!

Until Next Time,

Creative Consoles

Stuck on designing an empty foyer... or a lonely hallway?

And...You have this skinny table, somewhere pretty prominent in your home...
what do you do with it?!


Here are some tips for using and accessorizing your 
console tables throughout your home!

If your console doesn't have any storage beneath, use it for extra seats!!
This would be great for areas you don't have a lot of seating,
but don't necessarily need it all the time.

Pinterest Source
A simple vase and bowl can jazz up a simple console. No need to clutter.

Zgallerie

Mirrors over consoles are always nice, and usually a good way to make the room feel larger.
Flanking both sides of the console with a decorative table lamp can ease the symmetrical feel.

Pinterest Source

For a more casual look, be asymmetrical with the placement of vases and only use one lamp.


Very minimalistic look here, a similar glass table can be found at High Fashion Home

High Fashion Home
Layer a few pieces art and tilt them up against the wall for a more casual look
 instead of attaching them to the wall.

Pottery Barn

Over sized piece of art?? Try it, you might like it;)

Make use of the bottom shelf of consoles by stacking books and accessories

Pinterest Source

A few "Deal Finders!!" for you!

Haute Box $299

Target $249
And this I just love and it was a deal finder in itself!! High Fashion Home $299

Until Next Time,

Patio Perfect


Even though it is "freezing" in Dallas right now,
it IS time to start thinking about the great outdoors!


Many of you are traveling for Spring Break this week, but
if not, get outside and get a jumpstart on your outdoor living space.


Here is mine... (I need it to look like this again... since
now it is dull, dreary and... dirty!)


And this side of the patio... covered with pollen- sigh...
(and dead plants:)


Now let's work on yours...


PATIOS: They are a part of our lifestyle -- extending our family rooms 
into the outdoors to take advantage of nature, sun, and fresh air.
They are transitional spaces that blend the best of indoor and outdoor life.
More than ever, patios are where we entertain guests, spend time with families,
or just get away from it all. Drool over these beautiful patios and
steal some of the ideas to try in your own outdoor getaway!

Candles?? Yes please.


Color, Color, and more Color!


Accessorize with lanterns, baskets and pillows


Garden stools are the best kept secret...until now!


Wall Planters! (Easily a DIY project)


Create your own hanging garden


Even though it is outdoor, don't be afraid to make it look like home


I would feel like I was at a resort everytime I walked outside if I lived here! Amazing.
(Yet again, more garden stools!)


For a natural, organic, and free-ing look, try hanging glass (or clean plastic) bottles
filled with flowers and hung with twine from trees, or a covered patio.


Even if it's not Christmas, a few lights make everything seem a little more festive!


I found a few outdoor specials today while browsing around and
thought I'd share in case you've been inspired!!

Horchow Tables


Horchow Garden Stools


Pottery Barn Lanterns


Pottery Barn's Capiz Votive Holder


Pottery Barn's Magnolia Blossom String Lights


Pottery Barn's Punched Ceramic Lanterns

Until Next Time,

Client Project: New York, New York: Mantles that Work


Remember my client, New York, New York???


Did you think I gave up on the project?
I have to confess it might have been easier to level
the entire house instead of piecing together 
the intensive remodel that we have almost pulled off!


Another sneak peek up top at a cool feature-


T vs. NY, NY: The Transitional mantle


Here's the before:


The "After" mantle is drool worthy...


Now that the mantle is in... what do to next?


Here are some pointers to take yours from
"Bare to There":


Mantles -- The "eye catcher" of your home and place 
you can be most creative! Do you ever get stuck and 
not know what to do on this "stunning" location?

Here are a few tips to help out!

1. Add a different shaped mirror centered above the mantle to 
add a different element to a symmetrical room. Add your own “finds” in 
vases on the mantle – kids pick you a pretty flower? Add that to a vase!

2. Frame out an area above your mantle and paint the area inside 
a complementary color to the room! Make this area special by adding
same size frames spaced throughout. I love how this picture shows a 
tall vase with small branches reaching to create height.
 It makes the pictures seem to be in the background, but they add so much!

3. This mantle comes to us from Sweet Something Designs
 She flanks both sides with tall vases that hold a mix of branches and 
 green/white accents. I LOVE the symmetry of this pieces.


I just liked this image ;)

(via)
4. Paint! Paint your mantle and the space above the mantle to 
create a focal point of the room. Base the color of the paint on
something from the room, like this space, the grey/blue hue comes 
from the stone surround of the fireplace.


5. Want to be BRAVE?? Well this is an inexpensive alternative to an 
actual piece above the mantle…find a decal that you love and fits your space
They offer these at Target, and lots of online stores!

(via)
6. Layering – In this room, the fireplace really contrasts with the rest of the 
 room as it is color-filled and unique. These black and white photos framed 
in a simple white frame and layered on top of each other is a great contrast.

(via)
7. This sculptural symmetry is great! As BHG puts it in these next two photos: 
Start with a large object in the center (here, driftwood), then place pairs of 
objects on either side. They don’t have to be identical, just related. 
For example, two different terra-cotta pots still look like they belong together. 
Symmetry doesn’t have to mean stiff —
the organic shapes of branches and seedpods keep this arrangement casual.

(via)
8. An asymmetrical arrangement harmonizes objects of different shapes and sizes
 Balance a tall, large object with several smaller ones, but not too small — 
 mantles swallow up dinky accessories. 
A similar color palette gives unrelated objects a theme. 
Shop your house or discount stores for items in the same color family. 
You can’t miss with pitchers, plates, books, and pottery.

(via)
9. A homemade mantle. Go outside and grab a few leaves and 
branches to sit in a vase, a few pine cones and an old barn door to 
make a backdrop for this fall mantlescape.

10. Stair step thicker objects and place a surprising thin, tall piece at the end. 
This harmonizes the setting as a whole, but leaves
 the asymmetrical look in place.

11. Minimalistic – There is always something elegant and striking
 about a simplistic design. Don’t be afraid to “not clutter”. 
 This is a good lesson to learn!

(via)
12. A great modern fireplace approach! Granted…most of our homes don’t 
look like this, but who’s to say they can’t?! Again, we have layering of
 different sizes and shapes of pictures frames, bringing the largest to the 
front and smaller to the back. But the fireplace design as a whole….
a concealed firebox that doesn’t continue to the floor, 
without a hearth and a simple wood block as a mantle. Great.


(via)
13. Different panes – think of the decor on different “panes” as if you 
were walking straight, you would come first to the first pane, then run into the 
2nd and so forth. A great idea for a deep mantle
On the back pane we have a simple repetition of framed images 
which is simplistic enough to set as the “back level”. On the front pane 
use different mediums and materials in the items you choose.

(via)
14. Here is a second image to echo what the last image shown. 
Several levels throughout. To add something different, use oversized vases 
to less than overpower the large framed art or mirror behind.

(via)


So much more to show you of the showpiece of New York, New York.
Carpet installed tomorrow... whoop, whoop!
We are almost there!
Until Next Time,
Powered by Blogger.